Confession: I haven't begun repairing my copy of The Disappearing Floor yet. I did take some time to look the book over to check out what I needed to do and how to approach it. I'm still uncertain about how much work I want to do with the cover itself. I'd like to give it a proper repair, but I'm not sure how well I can manage the necessary work.
The best repair would be if I could separate the actual printed paper cover from the boards first, then back it with an intact sheet to back all the tears and weak areas, then replace the boards. I'm not confident that I can remove the paper from the boards without damaging them further. The same applies to the endpapers. If I had something to dissolve the glue and allow me to remove the paper, that would be wonderful. I don't know what would work...
So, I stalled the project while I consider. Ultimately, I want to record the repair work as fully as possible. That brings us to a second consideration - that of recording the repair work. I did spend some time working with OBS Studio to set up my cameras and audio so that I can start recording once I'm ready to do the repairs.
The issue is what will work best as a video. A full-length video of the repair would be long and feature moments of inactivity, but an edited video would mean a new level of project management that is again beyond my knowledge. I could learn, but I was looking forward to this being a more polished showcase of the process. That was always going to be a stretch, but it is a nice hope.
Since I'm not going anywhere soon, I think the stall will only be temporary. I want to experiment with the adhesive on the book, then get to work on the repair. I still need to think about the filming of the process. Is it enough to show the spine of the text block with the aging bits of fraying cloth and adhesive and explain what I plan to do, or do I need to show the full process of removing it and cleaning it up for new PVA?
I think the ultimate answer lies in the middle, with some repairs best shown in full, and others introduced, perhaps shown in a sample, then skipped for the most part. This may end up being more of a test, after all, if only of the video composition.
As an afterthought, I did another repair within the last year that I intended to upload to YouTube, but the audio didn't record properly, so I couldn't use about half of the footage. I started working on it to salvage what I could, but I wasn't happy enough with the result to post it. I may take a little time now to revisit it and try overdubbing some audio and see how that plays.
Tuesday, April 14, 2020

Monday, April 6, 2020
Rainy Day Project or The Corona Cure
 I've got a copy of The Hardy Boys The Disappearing Floor that is in need of repair. I put off doing anything with it, with the intent of turning it into a repair project to put up on YouTube. Given shutdowns with the coronavirus, I feel like I have the time at hand to start working on it.
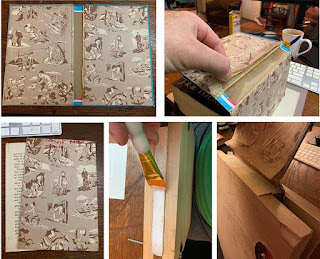
I have begun some preparatory work on the book in anticipation of repairing it. The text block had partially separated from the covers, and were only connected by the mesh backing on the text block, the crash (if memory serves me correctly). This fabric wraps over the text block and is what actually connects it to the cover of the book beneath the end papers. The mesh was fraying and the text block was pulling away from the covers. I used my x-acto blade to cut through the threads and separate it entirely.
 My thinking is that I will need to replace the connecting tape to resecure the text block to the covers. The simple fix would be to use bookbinding tape to wrap the block and PVA to adhere it to the endpapers. Unfortunately, the text block itself shows signs of further separation. As the photo on the left shows, the pages are coming apart from each other even though they are still secure to the binding crash. It is clear that the fabric is very brittle and cracking as well as pulling apart, and the binding glue on the original is also brittle.
My first order of repair will be to remove as much of this original adhesive and fabric as I can, then apply new PVA to the text block once it is secure in my binding jig. When it is time to connect the text block to the covers, I will use binding tape to further strengthen the spine of the text block. This tape can be used to bind the text block to the underside of the endpaper, and with PVA to the covers themselves.
One concern with the covers, and frankly one of the reasons I've delayed starting this repair before, is some damage to the cover itself, particularly on the shoulders connecting the spine to the front and back cover. I had thought at one point to try removing the actual paper cover from the boards and replacing the boards with new cardboard. I still think that would be the best option, but I fear it is still beyond my ability. I will save that level of repair for another day.


As you can see in the two pictures at the right, the shoulder connecting to the front cover of the book is badly torn, even through the cover itself. Also, the end paper for the back cover has been separated. I'm not sure if the end papers were originally a larger sheet of paper, folded and affixed to the text block, then glued onto the covers, or if they were individual sheets glued together with the text block.
I think using a larger size end paper and folding it would give a better look and be more secure, but I think the other option is the one used. It is difficult to tell on some of these older books, since the glue fails, the mesh frays and tears, and the constant handling causes the joins between the end papers to crease and crack as well. I think the best option will be to separate both endpapers, clean the adhesive and attach them to the text block itself.
As for the damaged spine, I think I will find some index weight card stock and add a strip or two to the interior of the spine in order to reinforce it. Hopefully, this will also allow the paper of the cover to be straightened and by gluing it to the reinforced spine, should conceal the worst of the cut running down the shoulder. Another option would be to use book tape to secure the inside of the paper cover, then reinforce the spine. This is probably the better option. It will require lifting the end papers from the boards first. Actually, it may not even help, now that I think it over. The boards will still be attached to the paper cover, and short of replacing them, I won't be able to reinforce the paper itself. I''ll have to make a judgement call on this when I'm repairing it in actuality, based on what I find before me.
I will begin working on this later in the week, and post updates on my progress. I need to be sure to take photos as I go, in addition to filming the repair, in order to show the work as it progresses and how the repair comes out in the end.
Sunday, November 10, 2019
Building a Collection

I have been building a Nancy Drew collection, and saw this as an interesting opportunity to get a book I needed at a better price, but still have a good copy in my collection.
I found a listing for a book with a split text block. Knowing it wasn't likely to be bid up due to the damage, I bought it. When it arrived, it was an easy fix for me after a number of repairs I've already done. I was thrilled to see the book in such good condition when it arrived. Really, it was just the split text block.
Unfortunately, the way to fix this is to peel up the end papers, then PVA the spine of the text block together, apply book repair tape and reaffix cover and text block. I'm happy with the result, and now have a readable copy of Nancy's Mysterious Letter that has a new lease on life.
Sunday, November 3, 2019
NaNoWriMo 2019
It's November again, so I'm trying my hand again at writing a novel in a month. 50,000 words seems like such a daunting total, but it can be achieved fairly easily. I've succeeded three straight years, and this will be a fourth.
Thinking of the Hardy Boys can be very helpful. I just did a quick check, and the average line count in one of the books is 9, with 30 lines per page. A 200 page book yields 54,000 total words! So my goal for NaNoWriMo this year is to write a Hardy Boys book.
It has been a slow start since a storm knocked out power on the first, and it wasn't restored until late afternoon on the second… but I was able to write about 400 words on my phone the first day, and added 200 more on day two before the power came back. Since then, I've gotten my word count up to 5001, so I'm 1 word ahead of pace for the month!
I'm thinking about posting each chapter up on here as a blog entry as I finish it. That way you can read along with me as I write (assuming anyone actually reads any of these posts, lol). In any event, it gives me some convenient material to post on a daily (for the most part, anyway) basis. It will be nice to throw some content up here a bit more regularly.
_____
On another front, I'm still working on the video of my last major book repair. The audio got screwed up and didn't record, so I'm planning to run part of the video at double speed and record a VoiceOver explaining what I am doing as I go. This is at a standstill since the reason the audio got screwed up was because my headset bit the dust, and I need a new one.
I've been going through a number of my duplicates, and touching them up with PVA glue where the covers are starting to loosen from the text block. If I can fix these minor errors soon enough, I can keep these books from falling into the desperate condition I've been working on with titles so far. My original text copy of The Tower Treasure that I got at a yard sale for a quarter as a kid basically fell apart in my hands as I tried to mend it. In the end, I had to do more with it than any other so far. The front board actually fell off the spine as I was prepping the text block to get reattached. The outer cloth binding is basically rotted away. I used a strip of book repair tape on the inside of the cloth to hold it together, and some PVA inserted in the shoulder of the outer cloth to make sure it stuck down to the tape. It is back together, and I'll keep it for sentimental reasons, but I've got my eyes open for a better copy to replace it in my set.
I also have a picture cover copy of The Disappearing Floor in the original text that is coming apart in similar ways. I'm waiting to get a new headset for my computer, because that seems like a great candidate for another video attempt at repair. I may attempt a radical repair on it by trying to remove the boards entirely, glue a paper backing to the picture cloth in order to give it stability, then attach new boards and rebuild the cover of the book. It will be a real challenge and test of my ability, and I look forward to capturing it and sharing it with you.
I've begun reading through the Nancy Drew canon, and am very favorably impressed with the first three books. I found a really cheap copy of a later book in the series on eBay that had a split text block... Undaunted (after several successful repairs on Hardy Boys books), I scooped it up and will begin building (maybe literally) a set of Nancy Drews to share shelf space with the Hardy Boys. I'm looking forward to reading the book when it arrives, but almost as eagerly to doing the repairs on it to make it whole again!
Thinking of the Hardy Boys can be very helpful. I just did a quick check, and the average line count in one of the books is 9, with 30 lines per page. A 200 page book yields 54,000 total words! So my goal for NaNoWriMo this year is to write a Hardy Boys book.
It has been a slow start since a storm knocked out power on the first, and it wasn't restored until late afternoon on the second… but I was able to write about 400 words on my phone the first day, and added 200 more on day two before the power came back. Since then, I've gotten my word count up to 5001, so I'm 1 word ahead of pace for the month!
I'm thinking about posting each chapter up on here as a blog entry as I finish it. That way you can read along with me as I write (assuming anyone actually reads any of these posts, lol). In any event, it gives me some convenient material to post on a daily (for the most part, anyway) basis. It will be nice to throw some content up here a bit more regularly.
_____
On another front, I'm still working on the video of my last major book repair. The audio got screwed up and didn't record, so I'm planning to run part of the video at double speed and record a VoiceOver explaining what I am doing as I go. This is at a standstill since the reason the audio got screwed up was because my headset bit the dust, and I need a new one.
I've been going through a number of my duplicates, and touching them up with PVA glue where the covers are starting to loosen from the text block. If I can fix these minor errors soon enough, I can keep these books from falling into the desperate condition I've been working on with titles so far. My original text copy of The Tower Treasure that I got at a yard sale for a quarter as a kid basically fell apart in my hands as I tried to mend it. In the end, I had to do more with it than any other so far. The front board actually fell off the spine as I was prepping the text block to get reattached. The outer cloth binding is basically rotted away. I used a strip of book repair tape on the inside of the cloth to hold it together, and some PVA inserted in the shoulder of the outer cloth to make sure it stuck down to the tape. It is back together, and I'll keep it for sentimental reasons, but I've got my eyes open for a better copy to replace it in my set.
I also have a picture cover copy of The Disappearing Floor in the original text that is coming apart in similar ways. I'm waiting to get a new headset for my computer, because that seems like a great candidate for another video attempt at repair. I may attempt a radical repair on it by trying to remove the boards entirely, glue a paper backing to the picture cloth in order to give it stability, then attach new boards and rebuild the cover of the book. It will be a real challenge and test of my ability, and I look forward to capturing it and sharing it with you.
I've begun reading through the Nancy Drew canon, and am very favorably impressed with the first three books. I found a really cheap copy of a later book in the series on eBay that had a split text block... Undaunted (after several successful repairs on Hardy Boys books), I scooped it up and will begin building (maybe literally) a set of Nancy Drews to share shelf space with the Hardy Boys. I'm looking forward to reading the book when it arrives, but almost as eagerly to doing the repairs on it to make it whole again!
Friday, August 9, 2019
Fixing Up Books
I ordered some mylar sleeves to put my dust jackets in to help protect them from damage. Reading up on how to use them most effectively, they mentioned using a bone folder to get a sharp crease. Intrigued, I decided to look into buying a bone folder as well.

 The white endpaper HC had split at the front. The text block was intact and connected to the back cover, but the front cover had completed separated from the text. The silhouette TT was basically in the same state, but had a gauze crash around the text block that was still attached to the front cover. The front cover was loose, but not fully separated from the text block yet. The brown endpaper HC was the most challenging. Its covers were still snugly connected to the text block, but the block itself was split in two pieces in the middle of the book.
 I'm going to skim over the first two repairs, since I forgot to document them at all while I was working on them. For these, I scanned the endpaper artwork into the computer and printed new endpapers that I could fold and attach with PVA to the front and back of the text block. I removed both text blocks completely and cleared off the glue and gauze from the spine of them. Then I used the PVA to glue them together, and ultimately to glue the folded endpaper directly onto the boards of the cover. As you can see, the end result was a very snug fit for text and cover!


That was my rabbit hole... When I found that a bone folder ran between 5 and 10 dollars, but that I could get a bookbinding starter kit with 2 bone folders for $16... well, that was an easy decision. Skipping over the YouTube tutorial videos and buying odds and ends from paint brushes to book repair tape, I decided to try my hand on repairing three of my Hardy Boys books. There were three different editions to work on, a brown endpaper House on the Cliff, a white endpaper House on the Cliff, and a silhouette edition of The Tower Treasure.
 The white endpaper HC had split at the front. The text block was intact and connected to the back cover, but the front cover had completed separated from the text. The silhouette TT was basically in the same state, but had a gauze crash around the text block that was still attached to the front cover. The front cover was loose, but not fully separated from the text block yet. The brown endpaper HC was the most challenging. Its covers were still snugly connected to the text block, but the block itself was split in two pieces in the middle of the book.
 I'm going to skim over the first two repairs, since I forgot to document them at all while I was working on them. For these, I scanned the endpaper artwork into the computer and printed new endpapers that I could fold and attach with PVA to the front and back of the text block. I removed both text blocks completely and cleared off the glue and gauze from the spine of them. Then I used the PVA to glue them together, and ultimately to glue the folded endpaper directly onto the boards of the cover. As you can see, the end result was a very snug fit for text and cover!
The third book was a challenge. I knew that I had no way to replace the original endpapers, so it was essential to save them. First, I separated cover from text block, then used PVA to reseal the text pages into one block, with the flyleaf attached at the front and back.
Once this was dry, I reinforced the spine of the text block with a section of book repair tape cut to the width of the spine. Then I placed a full width of book repair tape over the spine of the text block to glue into the covers.
To prep the covers, I had to carefully peel the endpapers up from the front and rear boards of the cover. I was (miraculously) able to do this with only some minor damage at one corner. Before placing the book repair tape across the spine, I had scored the backing paper on it with two lines at the width of the spine. Then I removed the central strip of backing paper and set the text block in place. I slipped the back flap of tape under the lifted endpaper on the rear cover, aligned the rear flyleaf image and rear endpaper so that they were just touching, and removed the backing paper from the back flap. I carefully pressed the endpaper flap onto the adhesive of the book repair tape.

After this, I applied PVA to the underside of this join of the rear endpapers, and pressed it down into place. I placed this in my jig to press it while it dried. For the front of the book, I first applied PVA to the underside of the front endpaper directly on the board of the cover. Then I slipped the front flap under the lifted front endpaper and aligned the front flyleaf with the front endpaper. Once the join was snug, I lifted the endpaper at one end while pinning it in place at the other, in order to remove the backing paper from the repair tape. Then I worked the two together and used the bone folder to smooth the papers down.
After a day in the jig-press, the book looks as wonderful as the first two attempts! I'm really excited at how well the repairs worked, and particularly proud that they went together without any major gaffes, and without needing to start over at any point. I have one or two more books that have loose bindings, and feel confident about fixing them soon. I sense my next challenge will be with a copy of The Secret of Pirate's Hill, which has some damage to the cover on the outside of the spine, in addition to the loose connection of cover to text block. I think I'll need to use the repair tape on the inside of the spine to mend it, then cover that with a spine stiffener before affixing the text block back onto the covers. I'll let you know how it works! I might even try to make a video of the repair...
Monday, July 22, 2019
The Quest Continues
As I've been going through the revised books, compiling the artwork together, and studying the different styles of the illustrations, I've also been searching high and low through the internet for any kind of clues about who drew the pictures.
The base assumption throughout the internet, and on every site with otherwise relevant information, is that an artist was commissioned to paint the cover art, and threw in the internal illustrations. For the initial run of original texts, this was undoubtably the case. Many of the early illustrations are signed, and when not, easily identified by the style. For the first 33 titles in the series, this meant producing a cover image, and a frontispiece.
The covers and frontispieces for the first fourteen books were done as paintings, with a full color printing of the cover image made for the dust jacket, and a black ink halftone used for the coated stock of frontispiece. Beginning in 1936, the frontispieces were created as black line art and reproduced on plain paper, like the text. Revised frontispieces were drawn in this style to replace the halftone images in 1944 and 45, and all subsequent internal artwork was done as line art on plain paper.
Some of these replacement frontispieces were not made by the same artist as the cover in use for that title, but if you look at who painted the covers for those two years during which they were replaced... you find Stricker and Scott. It's very likely that the practice of having the cover artist provide the frontispiece continued through 1949 and title #28, The Sign of the Crooked Arrow. Numbers 27 and 28 were both produced and signed by Russell Tandy. The covers for numbers 29-31 were painted by William S. Gillies, but the frontispieces are another story, as are the first two Rudy Nappi covers for numbers 32-33.
There is no credit on the frontispiece artwork for #29, The Secret of the Lost Tunnel, and #30, The Wailing Siren Mystery. They both look to be drawn by the same hand, and logic would presume that it was Gillies himself. It's hard to say for certain from looking at them. The covers seem very different - flat and two dimensional, like cut-outs set up in a diorama, then photographed. The colors are cartoonish, but I think the reality is that photographs were staged, then the covers painted from them. There is a realism in the features that make them look like they were painted from photos.
Curiously, the frontispieces for The Secret of Wildcat Swamp (Gillies) and The Crisscross Shadow (Nappi) are both drawn and signed by Roy Pellington. There is no signature for the frontispiece used in the original text printing of The Yellow Feather Mystery, and it's hard to be certain who drew it. It is similar in ways to the Pellington art, but also looks like it could be Nappi.
From this point on in the series, it becomes difficult to identify the illustrator with any certainty. Nappi is responsible for all the covers going forward in the series, and all but three of the covers for the revised texts of the books. Yet there are at least three distinctive styles used in the books produced in the 1960s and 70s, with George Wilson responsible for almost half of the titles.
The last seven titles published before they began the revisions in earnest are hard to label. I would say that #37-40 were drawn by Nappi, but the others differ too much to classify. #34 and #35 are similar to #33, but clearly different, as evidenced by these two strikingly similar images of Joe slugging a villain.
The image on the left is from #34, The Hooded Hawk Mystery. The image on the right is from #35, The Clue in the Embers. In the latter, Joe is a little boy. Some of the poses in the Hawk artwork reminds me of Nappi, but his covers feature iconic representations of Frank and Joe, and these drawings seem very different. The other possibility is that the artist was instructed to make the brothers more boyish from one book to the next.
 The other oddball title here is #36, The Secret of Pirate's Hill. Nappi painted the cover, but certainly did not draw the internal art. Compare Frank and Joe in the image to the right with the artwork above, or any of the painted covers... They are done by a separate artists. Fortunately, all of the internal illustrations appear to have been done by the same artist, and the frontispiece is signed!
 Unfortunately, the signature doesn't seem to reveal itself very clearly, as seen on the left. The author of #36 was John Almquist, which is tantalizingly close to the signature, but doesn't appear to be it, just the same. It appears to end in "-oyler", but the initial letters are written over each other making it difficult to separate them unless you have some names to consider.
So, I've been searching for information on who the Stratemeyer Syndicate used for illustrators. In the process of doing this, I found a copy of the decision rendered in the 1980 lawsuit between Grosset & Dunlap and the parent company of Simon & Schuster over who held the right to print old and new titles. In it, the judge mentions that Grosset & Dunlap contracted the illustrators for the internal art, but that didn't grant them joint copyright over the books since they weren't essential to the story. Apparently, the Syndicate gave them direction on what they wanted for the art, but Grosset & Dunlap commissioned and included the artwork as part of the printing process. That was new to me, will require a different tack to track down names for the artists.
The base assumption throughout the internet, and on every site with otherwise relevant information, is that an artist was commissioned to paint the cover art, and threw in the internal illustrations. For the initial run of original texts, this was undoubtably the case. Many of the early illustrations are signed, and when not, easily identified by the style. For the first 33 titles in the series, this meant producing a cover image, and a frontispiece.
The covers and frontispieces for the first fourteen books were done as paintings, with a full color printing of the cover image made for the dust jacket, and a black ink halftone used for the coated stock of frontispiece. Beginning in 1936, the frontispieces were created as black line art and reproduced on plain paper, like the text. Revised frontispieces were drawn in this style to replace the halftone images in 1944 and 45, and all subsequent internal artwork was done as line art on plain paper.
Some of these replacement frontispieces were not made by the same artist as the cover in use for that title, but if you look at who painted the covers for those two years during which they were replaced... you find Stricker and Scott. It's very likely that the practice of having the cover artist provide the frontispiece continued through 1949 and title #28, The Sign of the Crooked Arrow. Numbers 27 and 28 were both produced and signed by Russell Tandy. The covers for numbers 29-31 were painted by William S. Gillies, but the frontispieces are another story, as are the first two Rudy Nappi covers for numbers 32-33.
There is no credit on the frontispiece artwork for #29, The Secret of the Lost Tunnel, and #30, The Wailing Siren Mystery. They both look to be drawn by the same hand, and logic would presume that it was Gillies himself. It's hard to say for certain from looking at them. The covers seem very different - flat and two dimensional, like cut-outs set up in a diorama, then photographed. The colors are cartoonish, but I think the reality is that photographs were staged, then the covers painted from them. There is a realism in the features that make them look like they were painted from photos.
Curiously, the frontispieces for The Secret of Wildcat Swamp (Gillies) and The Crisscross Shadow (Nappi) are both drawn and signed by Roy Pellington. There is no signature for the frontispiece used in the original text printing of The Yellow Feather Mystery, and it's hard to be certain who drew it. It is similar in ways to the Pellington art, but also looks like it could be Nappi.
From this point on in the series, it becomes difficult to identify the illustrator with any certainty. Nappi is responsible for all the covers going forward in the series, and all but three of the covers for the revised texts of the books. Yet there are at least three distinctive styles used in the books produced in the 1960s and 70s, with George Wilson responsible for almost half of the titles.
The last seven titles published before they began the revisions in earnest are hard to label. I would say that #37-40 were drawn by Nappi, but the others differ too much to classify. #34 and #35 are similar to #33, but clearly different, as evidenced by these two strikingly similar images of Joe slugging a villain.


The image on the left is from #34, The Hooded Hawk Mystery. The image on the right is from #35, The Clue in the Embers. In the latter, Joe is a little boy. Some of the poses in the Hawk artwork reminds me of Nappi, but his covers feature iconic representations of Frank and Joe, and these drawings seem very different. The other possibility is that the artist was instructed to make the brothers more boyish from one book to the next.
 The other oddball title here is #36, The Secret of Pirate's Hill. Nappi painted the cover, but certainly did not draw the internal art. Compare Frank and Joe in the image to the right with the artwork above, or any of the painted covers... They are done by a separate artists. Fortunately, all of the internal illustrations appear to have been done by the same artist, and the frontispiece is signed!
 Unfortunately, the signature doesn't seem to reveal itself very clearly, as seen on the left. The author of #36 was John Almquist, which is tantalizingly close to the signature, but doesn't appear to be it, just the same. It appears to end in "-oyler", but the initial letters are written over each other making it difficult to separate them unless you have some names to consider.
So, I've been searching for information on who the Stratemeyer Syndicate used for illustrators. In the process of doing this, I found a copy of the decision rendered in the 1980 lawsuit between Grosset & Dunlap and the parent company of Simon & Schuster over who held the right to print old and new titles. In it, the judge mentions that Grosset & Dunlap contracted the illustrators for the internal art, but that didn't grant them joint copyright over the books since they weren't essential to the story. Apparently, the Syndicate gave them direction on what they wanted for the art, but Grosset & Dunlap commissioned and included the artwork as part of the printing process. That was new to me, will require a different tack to track down names for the artists.
Wednesday, July 17, 2019
George Wilson

In other words, it was largely circumstantial that George Wilson was the artist, but equally unquestioned which illustrations were his. Today I ran across a biography entry on George Wilson that features two telling bits of evidence that the information I've been believing is accurate. Namely, George Wilson is "made illustrations for romance and wild west paperbacks, including book series like 'The Hardy Boys'."
 What a feeling to have researched and found a name, grouped titles by matching the style of the artwork, and finding a corroborating acknowledgment that the linking of the two is accurate and justified. The second bit of interesting info was one of the samples of Wilson's artwork. In it, Tim Robinson is featured, looking very much like the iconic style of Joe Hardy that makes sorting out which Hardy Boys titles are illustrated by Wilson so easy.
For comparison, I used the frontispiece from Secret of the Lost Tunnel, which seems to be the only known illustration credited to George Wilson (in the UK imprint). I think the similarity is remarkable, and spot on. There are other instances where Joe is drawn even more like this image of Tim Robinson, but I wanted to use the credited illustration to strengthen the connection I'm trying to make. Joe really has a distinctive look in Wilson's drawings.

Subscribe to:
Posts (Atom)